
The System Administrator can manage data privacy and member settings in the Workspace, which includes the following sections: Members, Vendors, Categorization, Teams, Rules, and Integrations.
Workspace
The OpenEnvoy Workspace allows users to create teams, invite members, manage integrations, manage labels, customize thresholds, and grant users with specific level(s) of access to the tool.
The workspace allows the System Adminstrator to manage the following areas. Click the list item to be taken to that section.
- Members
- Vendors
- Jobs
- Categorization
- Teams
- Workflows
- Categorization Workflow
- Ownership Workflow
- Threshold Workflow
Members
There are multiple ways invite additional users to your account:
- Click the share button in the global navbar:
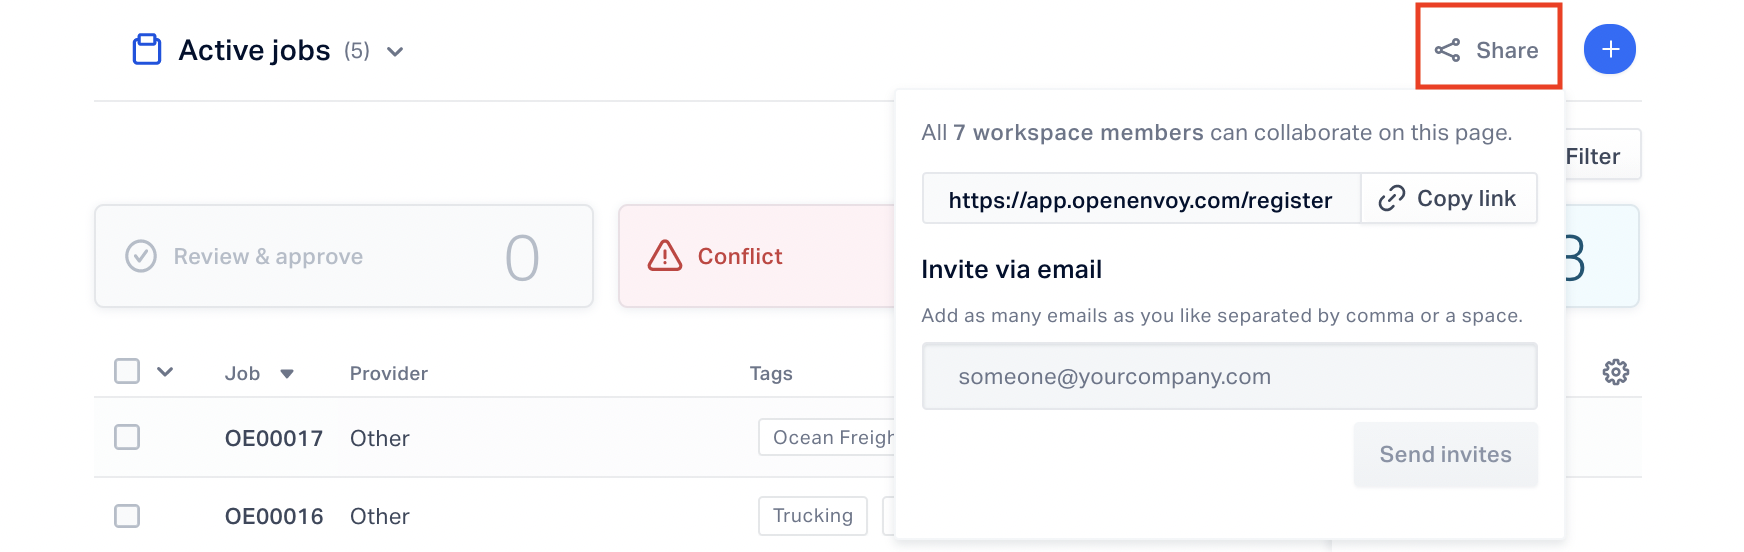
- You can also invite users from Workspace > Members, which allows you to assign roles, access, and team membership at the same time.
- When a user is invited to OpenEnvoy via email, the recipient will receive an email that looks like this:
.png?width=588&name=Screen%20Shot%202021-10-06%20at%203.31.34%20PM%20(3).png)
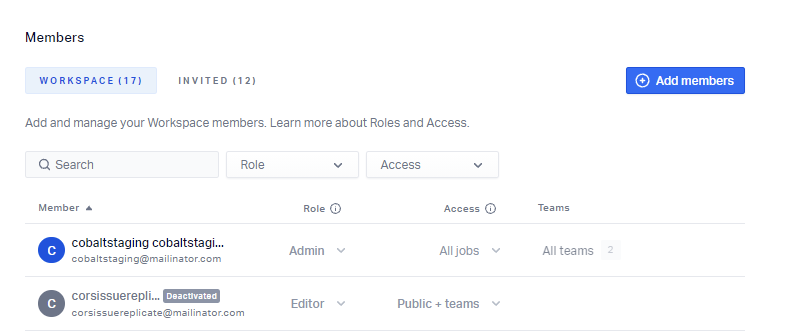
- You can also remove users and assign permissions from Workspace > Members.
To remove a member, click on the ellipses next to their information and choose the "Remove from workspace" option.
Once a user(s) has been removed from your OpenEnvoy Instance, these members will be designated a "Deactivated" label (see below).
This means that this user is no longer able to access your OpenEnvoy instance, however, all of their prior actions will be preserved in the system (i.e. labels applied, job comments, reviews and approvals, etc).
Please note: Only admins can assign permissions and remove users. By default, the first person to register for OpenEnvoy is the admin. There can only be one admin per account and only the account admin can assign a new admin.
The Members section allows the OpenEnvoy Administrator to control permissions of what users can see and do in the system. We refer to this as “RBAC” or Role-Based Access Control.
Role Options
- Admin: system administrator; can fully edit jobs, manage the Workspace, assign job
ownership. - Editor: can create, own, edit, approve, upload, share/invite, assign job ownership.
- Contributor: can own, edit, and assign job ownership. Cannot approve jobs or invite people.
- Approve Only: can approve jobs. Cannot edit jobs, assign job ownership or invite people.
- Viewer: can only view jobs. Cannot assign job ownership, approve jobs, invite people, or approve jobs.
The Members section allows the OpenEnvoy Administrator to control & limit what type of information a user can view within the workspace via Access.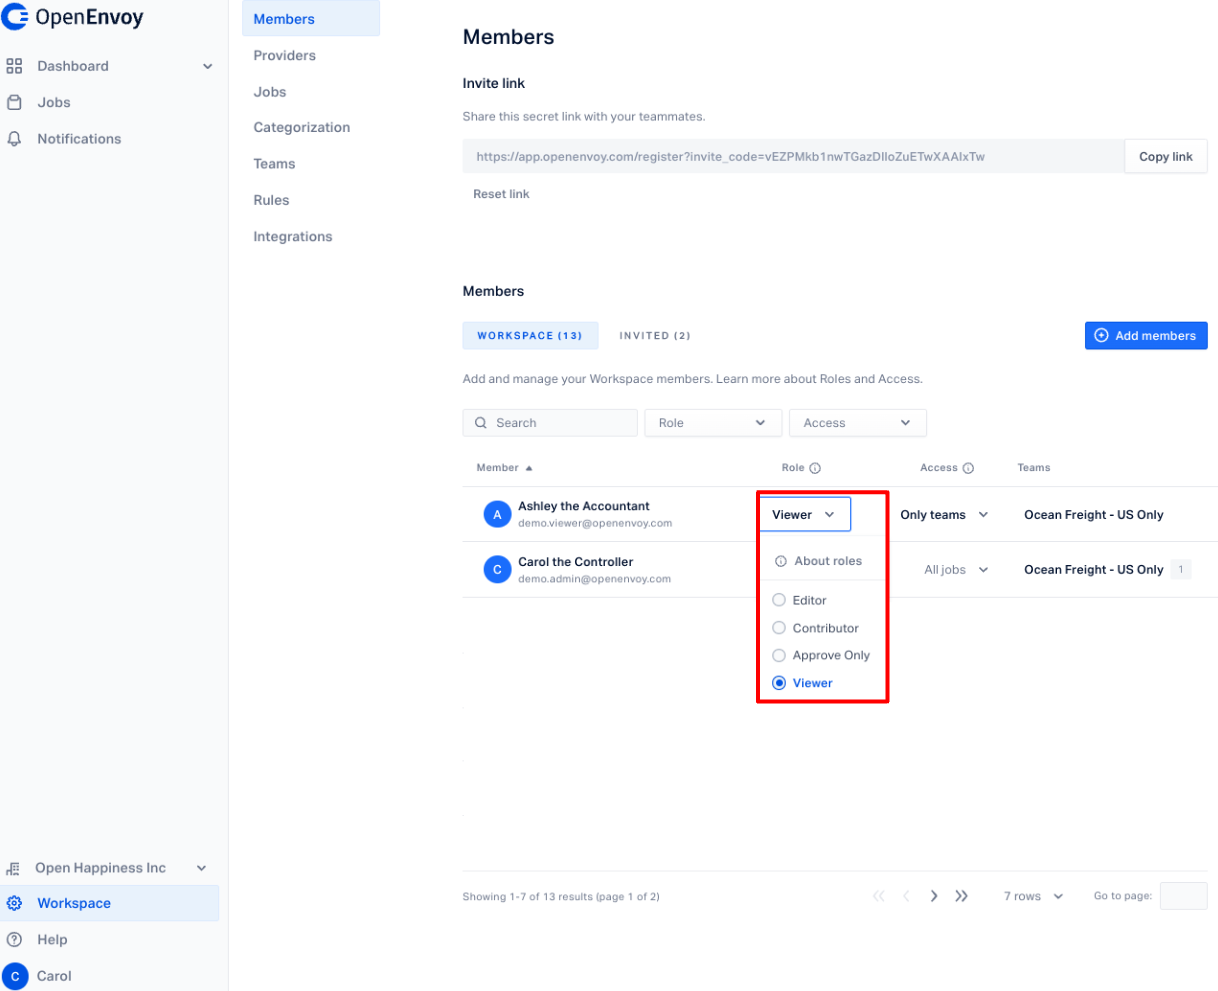
Access Options
You may establish Teams in the system, which have assigned users based on a grouping by categorization. Users can be part of one or many Teams. You can define a Team according to your business categorization, for example, department, business unit, organization, a third-party vendor.
Team access is controlled by assigning one of the permissions below:
All Jobs: can view everything (OpenEnvoy Admins will always have ‘All Jobs’ access)
Public + Teams: can see all jobs which belong to the user’s assigned Team, plus non-labeled jobs.
Only Teams: can only view jobs that belong to the user’s assigned Team(s).
Read more about configuring Teams.
Vendors
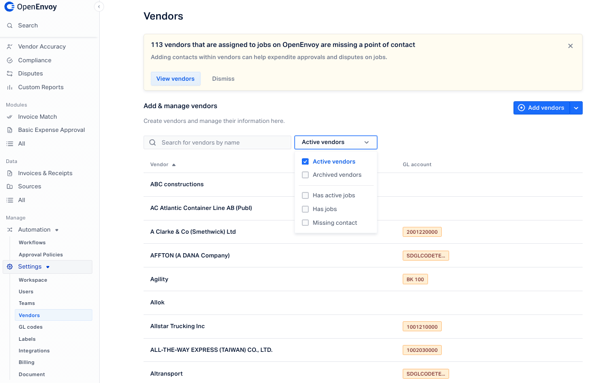
Allows the administrator to add & manage their global vendor directory within their workspace. Adding vendors to the global directory will allow all users within your workspace to filter the Job List page, Dashboard, Activity Log, and Rules by that newly added vendor. You will also be able to designate specific jobs to any new vendors that are added.
Any jobs that are created via a workspace email will automatically add any new vendor it detects from invoice extracted data into the global vendor directory.
Learn how to Bulk Upload Vendors to populate the Vendor Directory with all of your vendors and associated information at once.
Follow instructions below for how to add or edit vendor information one-at-a-time.
To add a vendor navigate to the "Vendors" section of the workspace and click the blue "Add Vendor" button on the right-hand side of the page, and select 'Manually add vendor'.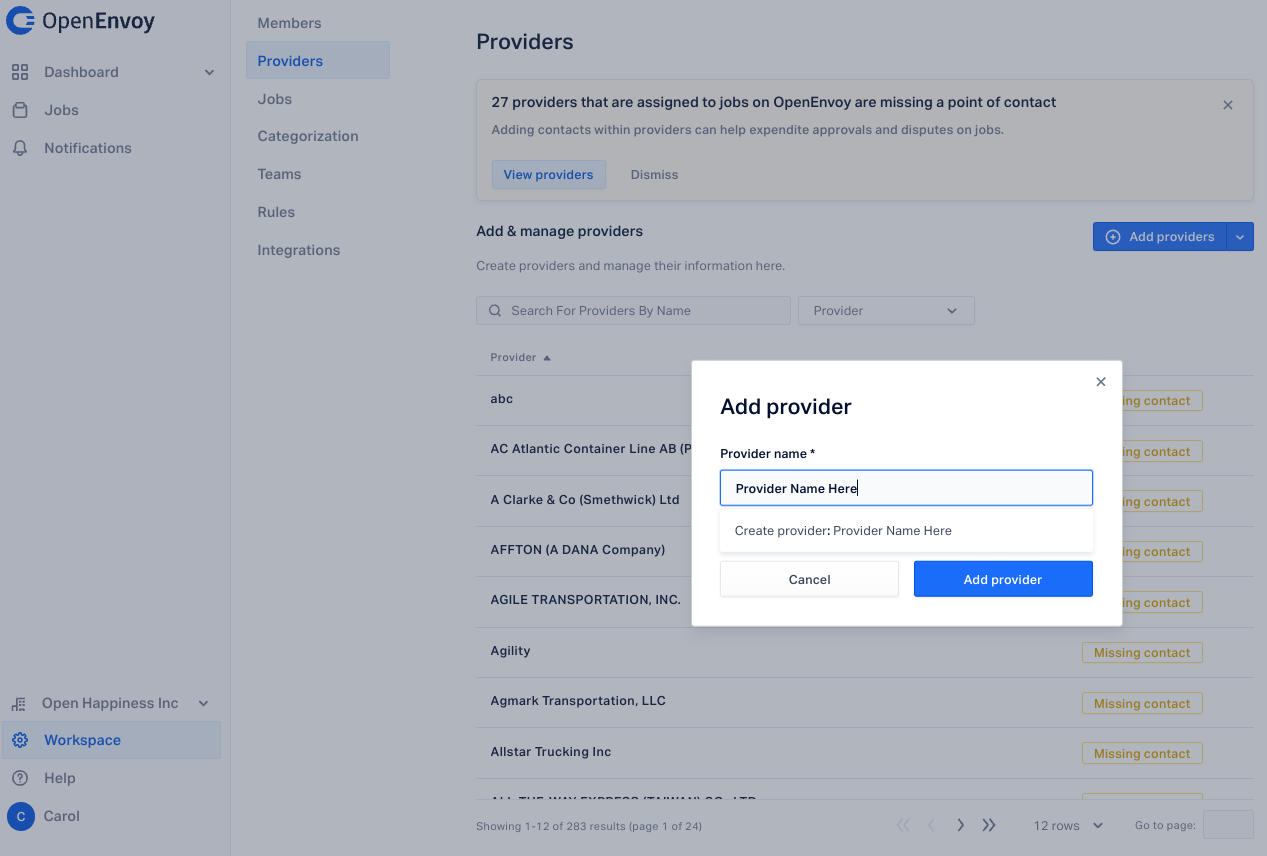
You will be prompted to enter the following information in the New Vendor screen:
- Vendor ID
- Comments
- Contact(s)
- Addresses (Mailing/Billing)
You can add multiple contacts for a vendor in the Contacts section. Click on the blue add contact button. You will be prompted to provide a contact's name, email, and phone number. 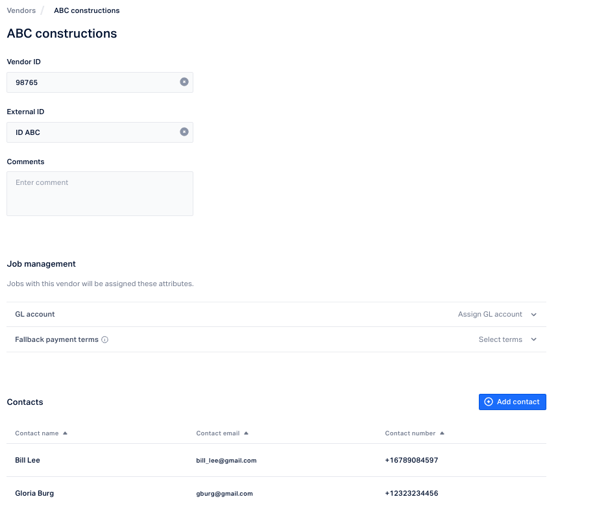
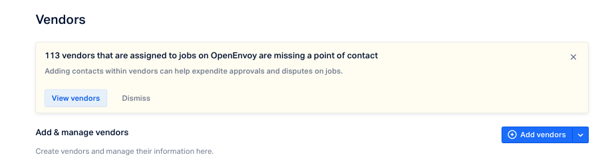
If any Vendors are missing a contact, they will be flagged to you in a banner at the top of the page when you click on the "Vendor Directory" tab.
A picklist is available to sort vendorrs by Active, Archived, Has active jobs, Has jobs, or Missing contact.
Jobs
Fallback owner
The default job owner, or fallback owner, assigned is the workspace administrator.
The workspace administrator may delegate fallback ownership to users which have Admin, Editor, or Contributor roles.
Fallback owners will have jobs assigned to them which are created by:
- a non-workspace member (via the workspace email)
- a workspace member (email or in-app) - job creator
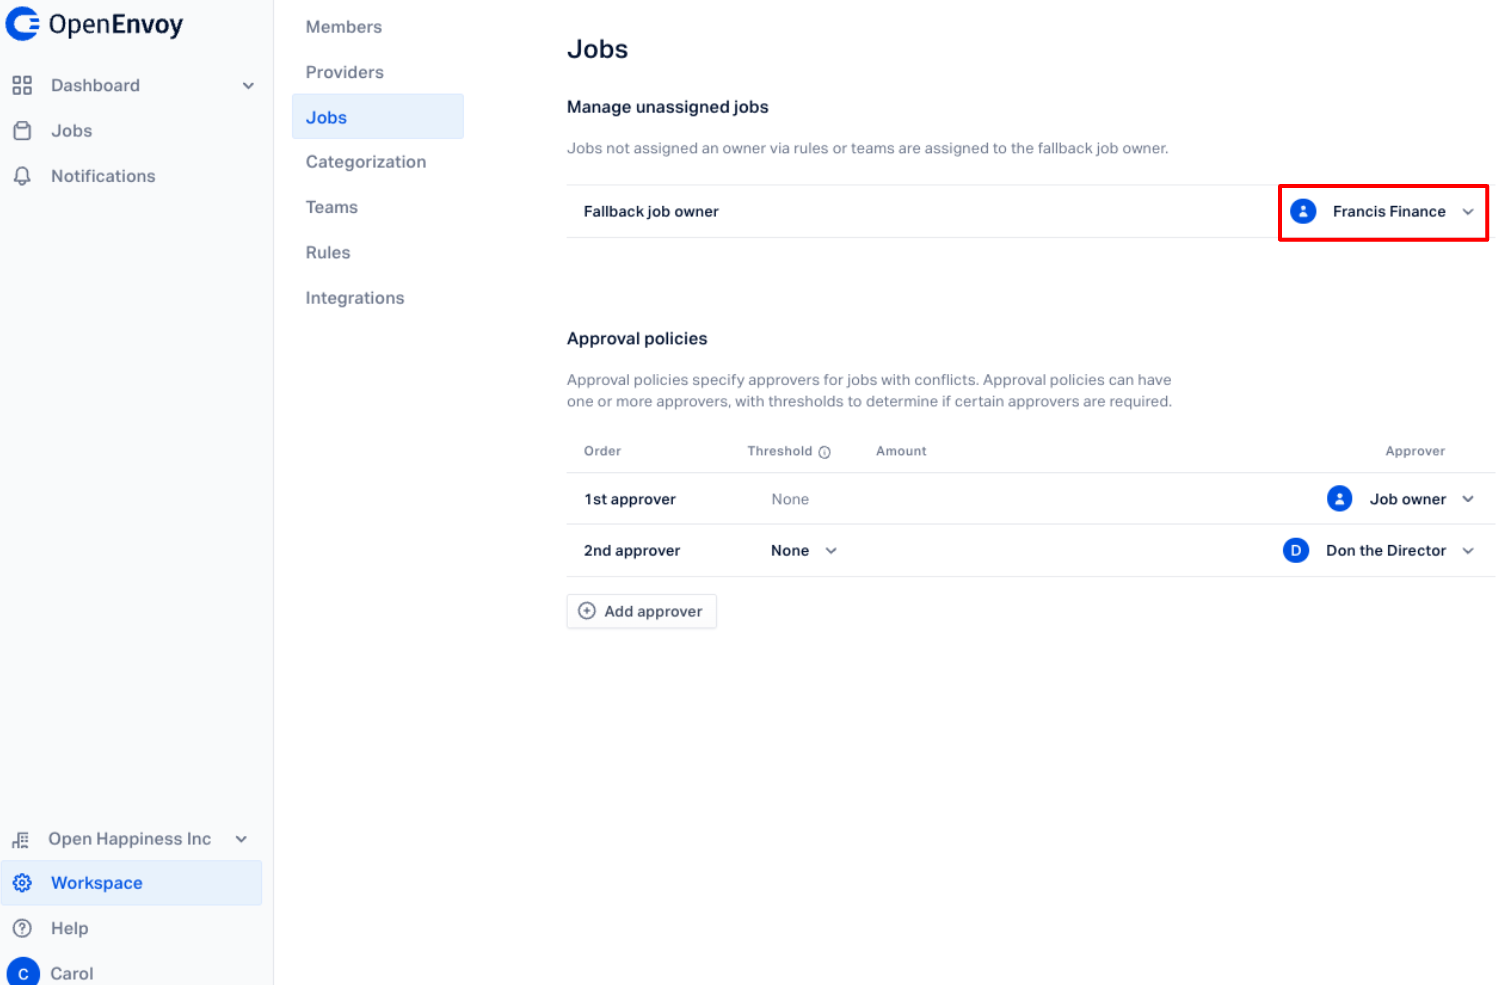
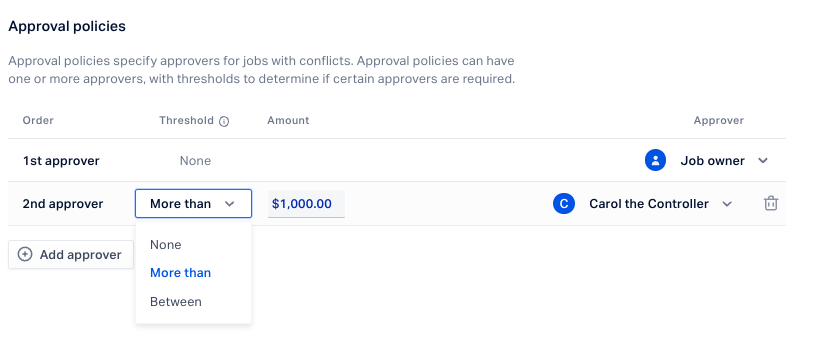
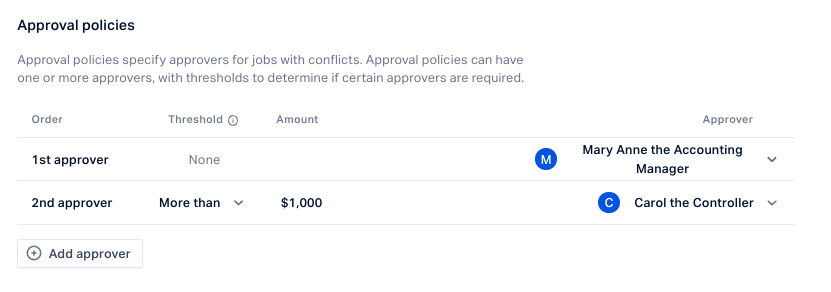
Approval policies
You may set approval policies to assign approvers for conflict jobs. Approval policies may have one or more approvers, with thresholds to determine if certain approvers are required.
Start with the 1st approver line - from the drop-down, select either Job owner or Specific user.
- If Job owner is selected, the job owner will be the first approver.
- An additional approver may be added by starting with the 2nd approver line.
- From the drop-down, select an option from the threshold logic: None, More than, Between.
- Enter the amount of the threshold. Users may select both the upper limit and lower limit when setting the threshold.
- Assign the approver from the user drop-down list.
- Add additional approvers and threshold logic by clicking Add Approver.
- To delete an approver level, click the trashcan icon.
- If Specific user is selected, start with the 1st approver and select a specific user to be the first approver. This can be changed at anytime by clicking on the approver's name to open the drop-down list, and selecting a different user.
- An additional approver may be added by starting with the 2nd approver line.
- From the drop-down, select an option from the threshold logic: None, More than, Between.
- Enter the amount of the threshold. Users may select both the upper limit and lower limit when setting the threshold.
- Assign the approver from the user drop-down list.
- Add additional approvers and threshold logic by clicking Add Approver.
- To delete an approver level, click the trashcan icon.
Categorization
Your data is organized in the system by categorization: Labels and GL accounts.
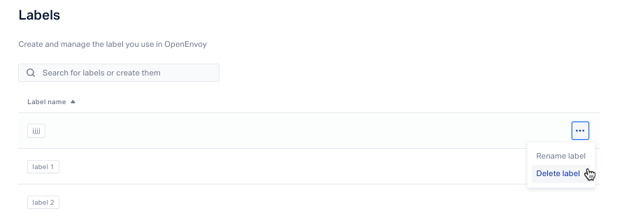
Labels
Labels can be created and removed from the system by the System Administrator. Labels are assigned to jobs and Teams as a filter for the purposes of data access/visibility, reporting, and dashboards. We recommend reviewing your label list often to ensure it is reflective of the various categories in your business.
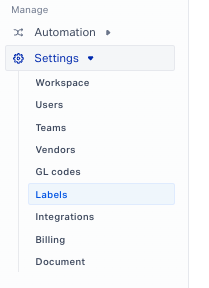
To manage existing labels or create new labels the user can go to Settings > Labels.
To search for labels or create a new label, type the label name in the search box and click Create label.

To manage existing labels, click the ellipsis on the row of the label where you can either rename or delete.
GL accounts
GL accounts are used to apply GL codes at the job level and/or job line item level. GL accounts help with job assignment, routing, and allow you to categorize expenses down to the line item level based on your organization's general ledger. We recommend reviewing your GL accounts list often to ensure it is up-to-date.
To create and manage existing GL accounts, go to Workspace > Categorization > GL accounts.
Learn how to Bulk Upload GL accounts to populate the system with all of your GL accounts at once.
The System Administrator can manually add a GL account name and GL code, then click the blue button for 'Add GL account'.
From the GL accounts tab, you can use the search bar to search GL accounts or codes. The system contains a duplicate check to ensure duplicate GL accounts are not added. At the moment, teh ability to delete GL accounts is restricted. Please contact support@openenvoy.com if you wish to remove GL accounts from your Workspace.
Job level: Add GL accounts
A user may assign GL accounts at the job (invoice) level.
Click into the Job, and within the Job header section next to GL accounts, click + Add GL account. A Job GL accounts modal will appear. In the example below, at the invoice level, there is no GL account assigned. Skip ahead to learn about line item GL accounts.
To proceed with a job level GL account edit, click the blue button for 'Edit invoice GL'.
Select the GL accounts you want to add to the job from the GL account dropdown.


Click Save.
The GL account(s) are now reflected in the job header section.

Learn how to remove a GL account from a job(s) or job line item(s).
Job line item level: Add GL account
A user may assign GL accounts to a job line item(s) two different ways: Job header or Job line item detail.
1. Job header
Click into the job, then the job header section. Next to GL accounts, click Add GL account.
A Job GL accounts modal will appear. In the example below, there is no GL account assigned. Click the light blue button for 'Edit line item GLs'.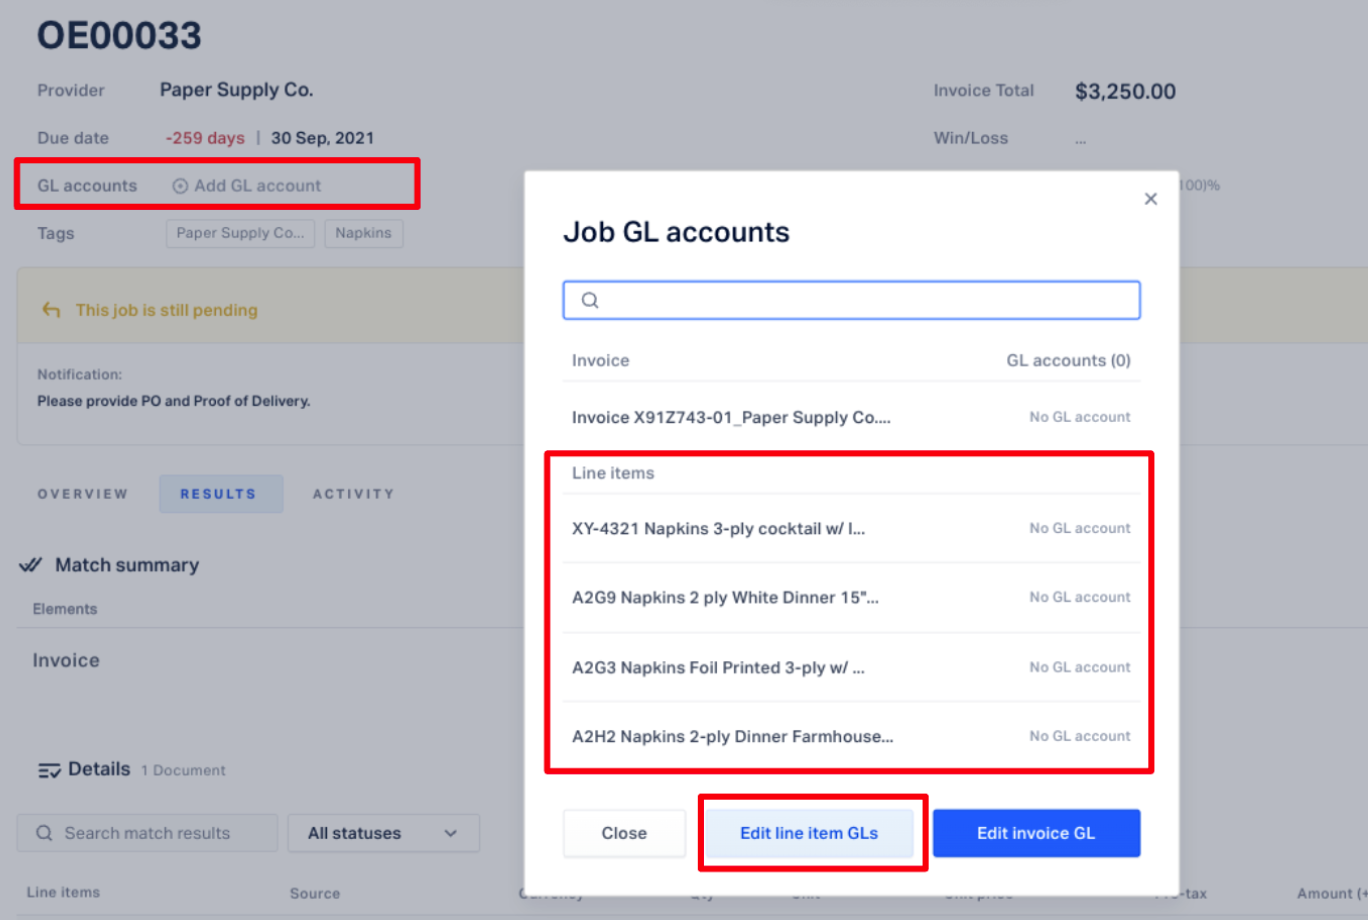
Select the line item(s) you wish to apply the GL account(s) to, and then select the GL account(s) from the dropdown labeled 'Update to'.


Click Save & close if you're finished making selections, or click Save & edit another if you'd like to continue selecting line items and assigning GL account(s).
You can now see the GL account(s) reflected in the line items of the job's Detail section, and GL account(s) assigned to line items will also appear in the Job Header section.
Learn how to remove a GL account from a job(s) or job line item(s).
2. Job line item detail
Click into the Job and select the Results tab. The Results tab shows the invoice line item detail.
Place your cursor over the line item you want to assign a GL account to, which will reveal the + Add GL account button (directly under the line item detail description). Click + Add GL account.
A window containing all of the line items and corresponding GL accounts will open with the line item already selected and filtered. Select the GL account(s) from the dropdown labeled 'Update to'.
Click Save & close if you're finished making selections, or click Save & edit another if you'd like to continue selecting line items and adding the GL account(s).
You can now see the GL account(s) reflected in the line items of the job's Detail section, and GL account(s) assigned to line items will also appear in the Job header section.Learn how to remove a GL account from a job(s) or job line item(s).
Remove a GL account from a job
To remove a GL account from a job header or line item detail, follow the steps above and select the Remove GL accounts option from the dropdown. Click the check box next to the line item(s) you wish to remove the GL account for.
Click Save & close to view the changes, or continue editing by clicking the Save & edit another button.

Teams
Teams can be created according to how you want users to access data that has or has not been assigned a label (categorization).
The system administrator is able to create, edit, and remove a Team. They can also assign a Team Administrator per Team. The Team Administrator can assign team labels and help manage team members and labels.
Teams can be Public or Private:
- Private - a small padlock icon next to the team name signifies that this team has been made private. Only the system administrator and assigned Team members will be able to view jobs and data relating to the private team including notifications.
- Public - Only team members have access to and receive notifications for jobs managed by a private team. A public job is considered a job that has no categorization (label).
The system administrator can view the Access column on the Teams page to review or modify team permissions.
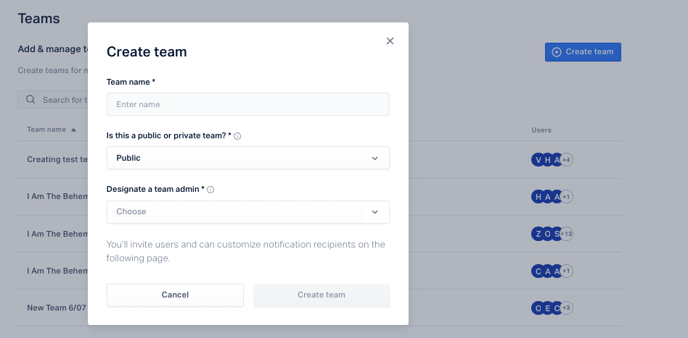
To create a new team, click on the Create team button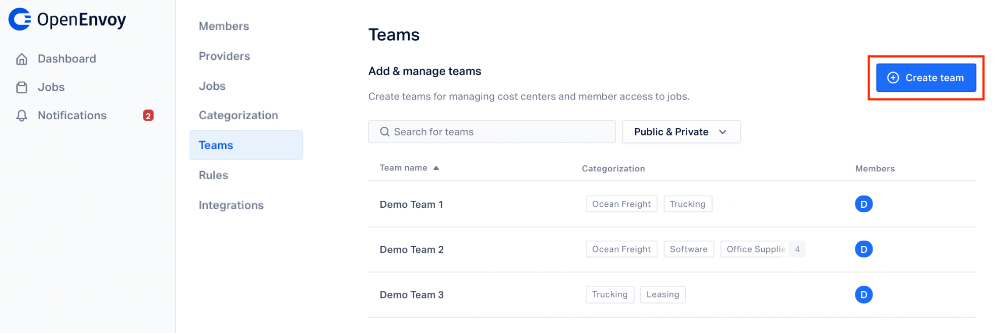
You will then be prompted to enter a team name, designate the team as public or private, and designate a team admin, and add labels specific to this team.
Workflows
OpenEnvoy provides admins with the ability to establish specific workflows that will further help automate the approval process. Workflows allow the admin to:
- Automatically approve jobs by defining predetermined limits for overbillings and/or underbillings with specific vendors (Threshold Workflow)
- Assign job ownership and route jobs for approval (Ownership Workflow)
- Assign or remove GL accounts, labels or job types (Categorization Workflow)
Follow the steps below to create a job-labeling workflow:
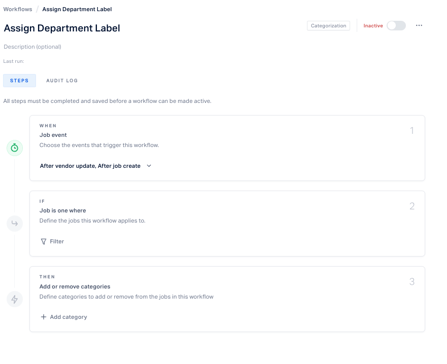
Conditions for Job-Labeling Workflow:
- When - this rule will trigger at job creation or during an update of the respective job.
- If - you may select a vendorr(s) that the rule will apply from the drop-down list or by clicking into the ‘add vendors’ box to make the selection.
- Then - At least 1 label must be selected. In this section please select the respective label for each vendor chosen.
Automatically assign team and ownership based on vendors:
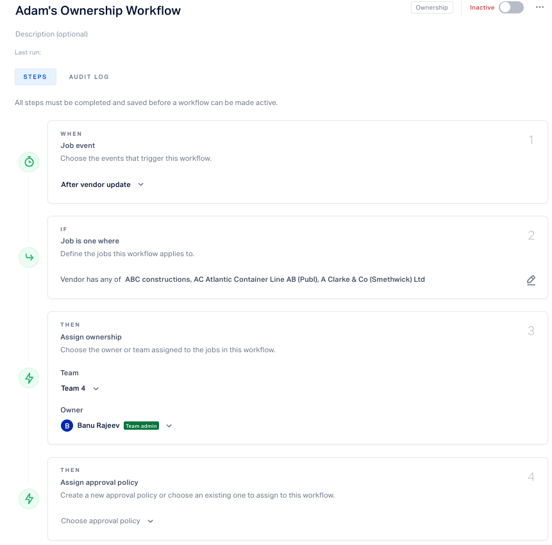
Conditions for Team and Ownership Rule:
- When - this workflow will trigger at job creation or during an update of the respective job.
- If - you may select a vendor(s) that the workflow will apply from the drop-down list or by clicking into the ‘add vendors’ box to make the selection.
- Then - In the team box select the appropriate team, then select an owner.
Managing Workflows
Once you have filled out all of this information click the blue Save button. The system will automatically approve the job which meets the above conditions.
The toggle in the top right corner is gray until you activate the workflow. If you are ready to activate the workflow, click the toggle. It should change to blue, indicating the rule is up and running in the system.
If you need to delete a Workflow, click the ellipsis in the top right corner and then click Delete. You can also inactivate a workflow if needed.
Audit Log
The Audit log provides you with an overview of all the jobs that met a rule condition and were processed according to an active "rule". The Audit Log also highlights when rules have been deactivated or reactivated. To view specific rule information for a job, including if the rule was successfully applied, click the arrow drop-down for the rule conditions which were applied.
Please contact your Customer Success Manager if you would like assistance setting up Rules.
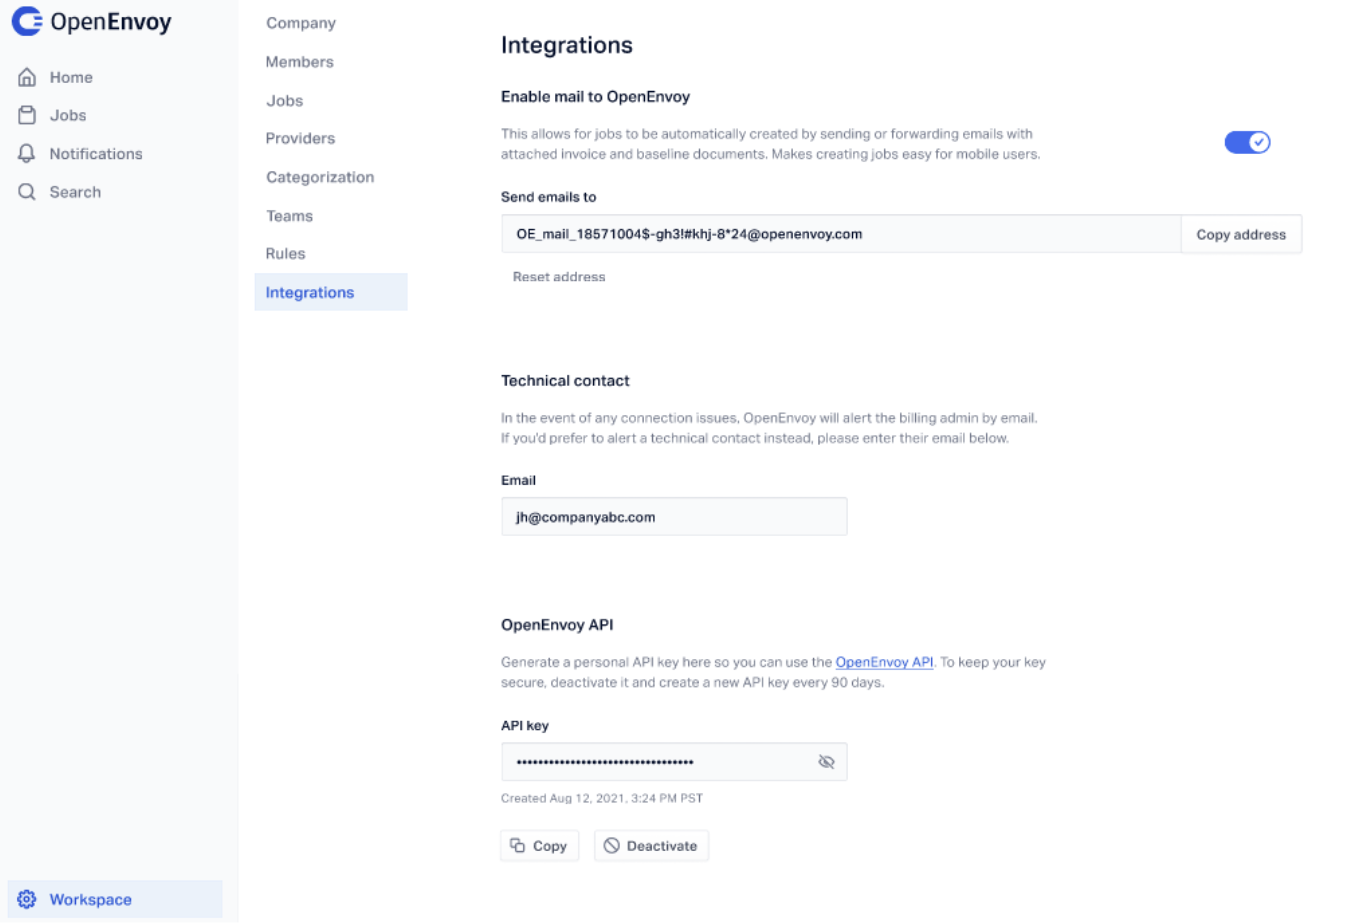
Integrations
The system administrator may enable jobs to be automatically created by sending or forwarding emails with attached invoices and baseline documents. To enable job creation via workspace email, click the toggle button so that it is blue with a checkmark icon. To disable job creation by email, click the toggle button so that it is gray.
Please use the workspace email address assigned to your organization to forward invoices and baseline documents to the system. This will trigger the job creation process in an automated fashion.
Read more about setting-up Integrations with OpenEnvoy using our Self-Serve API feature.
Notifications
Adjust notifications
Learn more about how to adjust your job notification settings.
Weekly Admin Spend Report
Workspace administrators will receive the below report via email every Monday at 6am EST.
The report includes the following metrics from the previous week:
- Top line reporting
- Dispute break-down
- Vendor highlights
-png.png?width=381&name=image%20(15)-png.png)
Email digest for priority jobs
Workspace administrators will receive the below report via email every Monday at 6am EST.
The digest is intended to provide an overview of priority jobs in the workspace which require action for: Conflict, Pending, Review & Approve statuses.
Each status has a Review button which will redirect you to the job list page with the specific jobs status filtered.
Alternatively, click the Review all jobs that require action button to view the jobs list page with all priority status jobs filtered: Conflict, Pending, Review & Approve.
-png.png?width=434&name=image%20(16)-png.png)
Please contact support@openenvoy.com for any questions